Frank Austin Nothaft

Chaparral Peak and Vollmer Peak–September 2nd

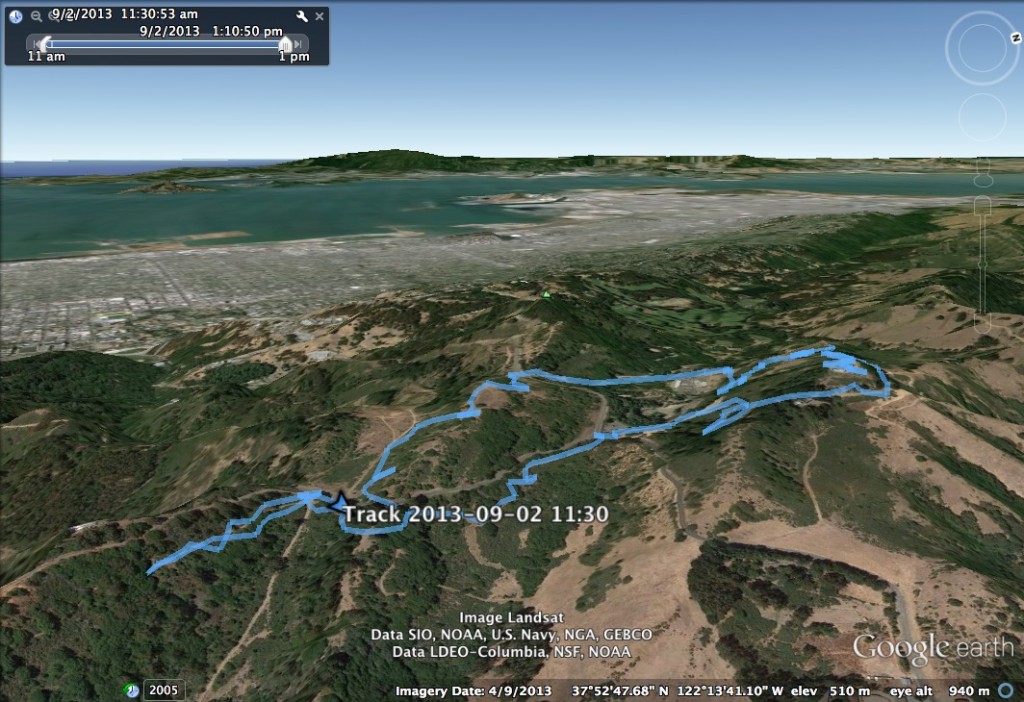
Moving to Oakland means one thing: I have lots of new hiking territory to explore! Over the long Labor Day weekend, I took the chance to go and explore Tilden Park in the Berkeley Hills. I went to Vollmer Peak, the highest point in the Berkeley Hills, and Chaparral Peak, the highest point in Oakland.

  • Destination: Chaparral Peak, and Vollmer Peak
  • Distance: 3.9 miles round trip, 0.3 miles to Chaparral Peak, 1.7 miles from Chaparral Peak to Vollmer Peak, and 1.9 miles back from Vollmer Peak
  • Elevation: 1,760 ft for Chaparral Peak, 1,905 ft for Vollmer Peak
  • Starting Point: Scotts Peak Trailhead
  • Route Finding: Easy

Route

Comments

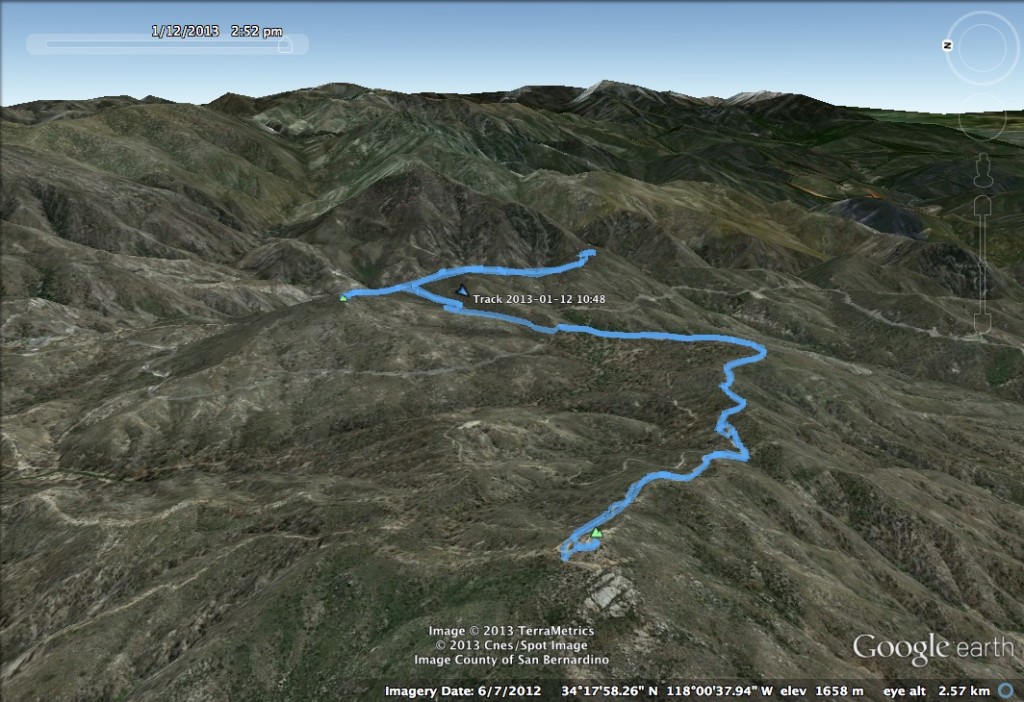
The route to Chaparral Peak starts off to the West side of Grizzly Peak Blvd as it snakes through the Berkeley Hills. This is about 1.5 miles to the south of Tilden Park. This route is a fire trail that is easy to follow and that leads quickly to the top of Chaparral Peak. If there is ever any question about which track to follow–simply always turn to the right! Chaparral Peak is a very simple hill to climb to the top of. Although there are nice panoramic views of the Bay from the trail up, the peak itself does not present many views.

From Chaparral Peak, we continued along the same fire trail until it met back up with Grizzly Peak Blvd. Here, we crossed and walked a short distance on South Park Drive into Tilden Park, until it met up with the Vollmer Peak Trail. This trail winds lazily through the park, until it reaches Vollmer Peak Road, which leads directly to the top of Vollmer Peak, the highest hill in the Berkeley Hills. Vollmer Peak provides spectacular views of the North Bay, and the interior East Bay.

East, Towards Diablo

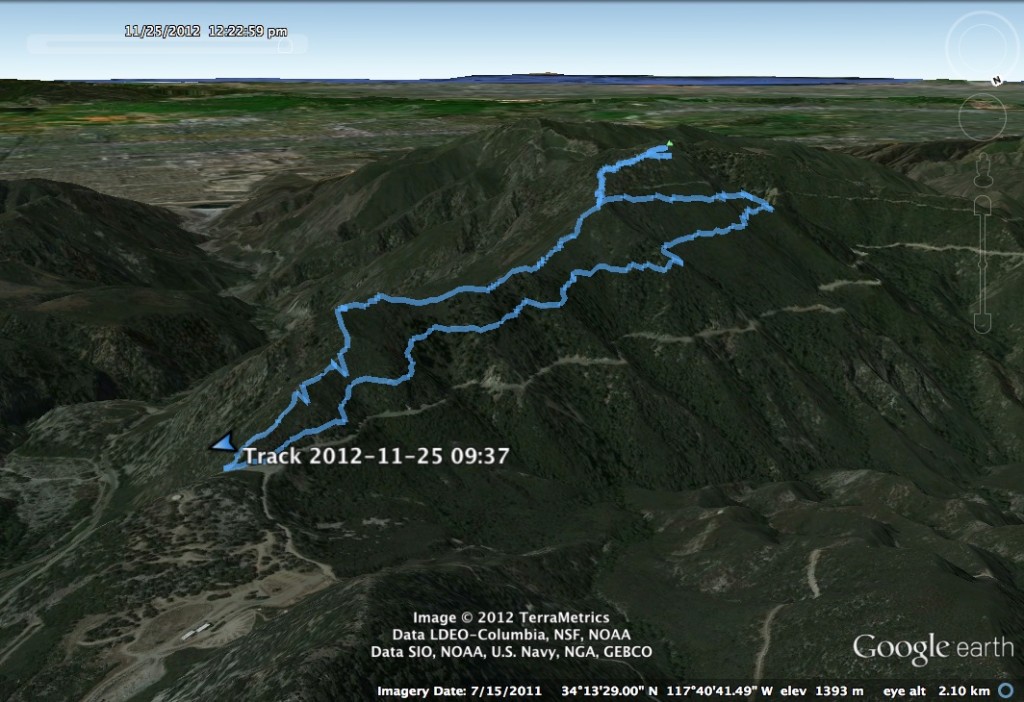
From here, we walked back down Vollmer Peak Road, until it intersected Lomas Cantadas. Here, the Bay Area Ridge Trail goes to a single trail dirt track across gently rolling terrain with very nice ridge views of the interior East Bay.

Bench Vista

This trail runs right to the East of Grizzly Peak Blvd for about 1.5 miles until it reaches a gate, across the road from where the fire trail we started on. On our hike, it appeared that the gate was locked, which does not seem usual. It is an easy gate to climb, but I would recommend checking whether the gate is open before hiking. I’m not sure if we missed an obvious way to get around the gate…

Going Back to Grad School

Today, graduate school begins.

About a year and a month ago, I decided to apply to do a PhD in computer science. At the time, I had been working at Broadcom for a year after completing my undergraduate degree. During my undergraduate career, I was fortunate to do research with several different faculty in several different areas of electrical engineering and computer science. I also interned in industry two summers–one summer each at SAIC and NVIDIA.

Going into the senior year of my undergraduate degree, I knew that I liked research, but I also had greatly enjoyed my time working in industry. My girlfriend at the time (who is now my wife!), was moving down to Southern California to start graduate school at USC. At the time, none of the schools in the Greater LA area were doing research that lined up with my interests. This pushed me into industry, and I found a job working at Broadcom in design automation and verification.

At the time, many of my friends and advisors warned me that going off to industry likely was the death knell for my academic ambitions. Many people pointed out that it is very difficult to go into industry, make a stable salary, make many friends, and to then give that up and go back to school. In some ways, I chose to take this to heart. I told myself that a PhD is a very large investment of time and energy, and I would use my time in industry to discover whether I was really more interested in research, or implementation. I knew at that point that if I decided to go back to school later, I would know exactly what I was getting myself into, and what I was giving up!

Two years later, I know that this was the correct decision:

  • First and foremost, a 24 year old is much more mature than a 22 year old. I’ve seen more technical problems, and I know more about myself, and what I want out of my career.
  • For an engineer, industry is the school of hard knocks: industry taught me to be a good engineer, as opposed to being a good engineering student. Customers demand perfection, and there is are several magnitudes of complexity that separate a good class project and a good product.
  • My work at Broadcom was about 75% ASIC implementation, and 25% CAD research. This mix taught me two critically important things:
  • Semiconductors are a booming field, but it’s not clear how much longer they’ll continue to boom due to the demise of Moore’s Law, and difficulties scaling to smaller technology nodes. On top of that, the big areas of growth (RF, bio, MEMS) are not areas that I am strong in.
  • I like working on products (and tend to get fiercely attached to them!), but my real passion is research. If I had to work from 7 AM to 2 AM just so I could squeeze several hours of research in, that was not an obstacle.
  • One last thought for anyone reading this: industry may ebb and flow, but the opportunity to go back to grad school is always there. However, a caveat exists: this opportunity will diminish if you do not keep in contact with the academics who you have previously worked with.

Long story short, it’s been an interesting ride, but I do not regret any of it. I had the opportunity to work on a fantastic team of individuals, working on cutting edge products. Two years later, I am headed back to grad school. In many ways, I’ve been able to have my pie, and eat it too.

South Mount Hawkins and Middle Hawkins–May 25th, 2013

The Crystal Lake area is a good launching point for many hikes. A few months ago, I had hoped to hike up to Mount Hawkins, but instead wound up heading to Mount Islip instead due to snow. On May 25th, I took advantage of a beautiful day to launch a hike up towards the Hawkins Ridge.

  • Destination: South Mount Hawkins and Middle Hawkins along the Hawkins Ridge
  • Distance: 11.4 miles round trip, 4 miles up to South Mount Hawkins via HPS #1, 2 miles to Middle Hawkins via HPS #4, and 5.4 down via HPS #3
  • Elevation: 7,783 ft for South Mount Hawkins; 8,505 ft for Middle Hawkins
  • Gain: ~3,000 ft
  • Starting Point: Crystal Lake Recreation Area at the end of Highway 39 above Azuza
  • Route Finding: Easy, except spur to Middle Hawkins is a bit hidden

Route

Comments

This hike is full of spectacular scenery, and features several well maintained paths. The hike starts down at the Crystal Lake parking area/campgrounds along the Windy Gap Trail. This trail climbs up to the dirt forest road 3N07, which runs along the west side of the Hawkins Ridge to a shoulder below South Mount Hawkins. This section of the trail has spectacular views of the bowl around Crystal Lake, that is ringed by Mount Islip on the northwest, the Hawkins Ridge on the east, and Smith Mountain to the South.

As a note, the mileage listed on the sign at the Windy Gap Trail and 3N07 intersection seems to be incorrect (trail is longer than signed). I had definitely expected it to end earlier than it did.

Crystal Lake Front Ridge

South Mount Hawkins is a short climb from this shoulder. From here, I proceeded north along the Hawkins Ridge Trail, which was recently rebuilt after a bad fire in the area. This trail climbs up to a short spur to Middle Hawkins. Most of the trail is clear and easy to follow, and the trail provides spectacular views of the Sheep Mountain Wilderness off to the east. This trail is fairly well shaded.

West of Middle Hawkins

From the Hawkins Ridge Trail, there is a spur off to the left that climbs up to Middle Hawkins. This trail is not marked, and is a bit difficult to find. It is a steep climb from this point up to the top of Middle Hawkins.

After reaching the top of Middle Hawkins, I set back on down, and continued on the Hawkins Ridge Trail north to the Pacific Crest Trail. I had hoped to reach this point earlier in my climb–had I made better time, I would’ve made a right turn and continued on to Mount Hawkins. Unfortunately, I was running slow, so I hung the left turn on the PCT to take me to Windy Gap, at which point I met up with the Windy Gap Trail and descended back to the Crystal Lake Campgrounds.

Potato Mountain — February 10th

This weekend, I had been planning to head off to Rattlesnake Peak, a 5,800 ft peak in the San Gabriel Canyon area. However, a winter storm came through, and snow levels dropped below 3,000 feet. Because of this, I decided to go for Potato Mountain, a 3,400 foot peak in the San Gabriel Mountains. Potato Mountain is part of the Sierra Club Lower Peaks Section and is located in the Claremont Hillsides Wilderness Park.

  • Destination: Potato Mountain
  • Distance: 4.65 miles round trip
  • Elevation: 3,422 ft
  • Gain: ~1,200 ft
  • Starting Point: Palmer Evey Mtwy at Mount Baldy Road
  • Time: 1h19 total → 1h45 up, 0h34 down
  • Route Finding: Easy

Route

Comments

Although Potato Mountain is a short hill, it presents very nice views of the front mountains in the east half of the Baldy Bowl area. On the way up, one has great views of Ontario Mountain, Sugarloaf Peak, Frankish Peak, and Stoddard Peak. At the top, Mount Baldy peeks over some of the foreground hills. The summit also provides a spectacular view over the Pomona Valley.

The trail up is very straightforward, and seems to be very well maintained. However, due to the (very rare) overnight snow melting off, it was muddy for my hike–thankfully, the snow did not start melting significantly until I started my descent. From the trailhead, the trail goes through a few low meadow-like areas, before starting to climb to a saddle. At this saddle, you’ll turn east, and follow a direct path up to the top of the mountain. The top of the mountain has a large cement cylinder, which I presume stores water or electronics.

Snow on Potato Mountain

All in all, the hike is fairly easy, and can be done pretty quickly. I dawdled on my way up, as I got distracted by photographic curiosities, and interesting conversation. I would say that Potato Mountain is definitely a good beginner hike in the San Gabriels. Since it is easy to get to, it is also a good short hike for days when one is pressed for time. As it is a lower peak, I would recommend it from Fall to Spring, but it has sufficient shade (below the saddle) to be doable in the summer.

Mount Islip — February 2nd

I’d always wanted to check out the Crystal Lake area. At worst, it’d wind up being a shortcut to the middle Gabriels that saved me from the long drive on the Angeles Crest Highway. At best, it would wind up being a beautiful area with many trails to hike. Iris and I decided to hike up the Windy Gap Trail to Windy Gap (surprise!), where we would decide on which direction to go next. We’d wanted to do the Hawkins via the Pacific Crest Trail (PCT) and South Hawkins trail, but it wound up being too snowy, so we went to Mount Islip instead.

  • Destination: Mount Islip via Windy Gap
  • Distance: 7.8 miles round trip, 3.3 miles up via HPS #3, 4.5 miles down via HPS #3 alternate (Islip Ridge to Big Cienega)
  • Elevation: 8,254 ft for Mount Islip
  • Gain: ~3,000 ft
  • Starting Point: Crystal Lake Recreation Area at the end of Highway 39 above Azuza
  • Time: 4h14 total → 1h59 up, 2h15 down
  • Route Finding: Easy

Route

Comments

As noted above, before heading out, I was a little concerned about the scenery back near Crystal Lake. This area was burned really badly by the Curve Fire in 2002, and many of the trails have just been reopened in the past few years. In reality, this area is spectacular–many of the trees down in the Crystal Lake basin have either not been burned or are recovering, and the hike up the Windy Gap Trail presents many panoramic views across the forest. Additionally, since the trails have all been recently serviced, they are in exceptional condition and are very easy to follow. As a practical recommendation, stop by the visitor center at Crystal Lake to pick up a trail map for the area — it came in handy during the hike.

The Windy Gap Trail is a pleasant hike up to it’s namesake and starts at about 5730 ft. We started around 10:30 AM, and made it up to Windy Gap by noon. On the way up, we experienced many panoramic views of the Crystal Lake basin, along with views of Smith Mountain, Mount Islip, and the four Hawkins.

View Across Crystal Lake

As you can see in the image above, there is a sharp demarcation that shows where the fire damage spread to.

We stopped for a quick snack at Windy Gap, and planned the rest of our hike. When we got up to the gap, it was snowier than we’d expected. It looks like right now, the snowline is around 7400-7500′ on the north/west side of slopes. Mount Hawkins was our original destination, so Iris did a quick excursion on the PCT to determine how snowy it was, and we decided that it was too snowy, and that we’d head to Mount Islip instead. We still encountered significant snow on the mile up to Islip from Windy Gap, but were able to avoid most of the snow by heading slightly off trail and taking the ridge most of the way to the top.

The Mount Islip summit presents incredible views of both the western San Gabriels and the high desert. An additional treat is the old cabin on the top of the mountain, which shows Mount Islip’s past importance for firespotting.

Mount Islip Ruins

We sat for a bit to eat lunch while enjoying the spectacular and somewhat surreal views. For our trip down the mountain, we decided to take the Islip Ridge trail to the Big Cienega trail. Part of this decision stemmed from a desire to take a different path, but from a practical standpoint, the ridge that this trail takes is south facing and is fairly clear from snow.

Mount Islip Ridge

The Islip Ridge trail is in very good condition, and was a very pleasant hike down. We eventually hit the Big Cienega trail, which brought us off of the Islip Ridge and back into the Crystal Lake basin and the Windy Gap Trail. Alternatively, you can continue straight on the Islip Ridge trail, which leads back down to the literal Crystal Lake. The Big Cienega trail has a few trees down across the path (I believe we counted 3?), but they can be crawled over and do not present too big of an impediment.

Welcome Back (to Discus)!

A happy video — this is from my first series of discus throws after having my shoulder repaired in June 2011. It’s taken a while to get back to the strength and flexibility I need to throw disc, but my technique doesn’t look too rusty!

Vetter Mountain, Mount Mooney, and Devil Peak — January 12, 2013

For my first hike of the new year, I met up with my good friend Ivan, and headed off to the area near Charlton Flats in the San Gabriels. Our mission for the day was to climb a cluster of 3 mountains: Vetter Mountain, Mount Mooney, and Devil Peak.

  • Destination: Vetter Mountain, Mount Mooney, and Devil Peak
  • Distance: 7.8 miles round trip, 2.1 miles up Vetter via HPS #1, 3 miles from Vetter to Mooney via HPS #1 and HPS #1, 1.5 miles between Mooney and Devil Peak by road and trail/bushwhack, and 1.2 miles down from Devil Peak
  • Elevation: 5,940 ft for Vetter Mountain; 5,840 ft for Mount Mooney; 5,870 ft for Devil Peak
  • Gain: 2,631 ft
  • Starting Point: Charlton Flats turnoff on Highway 2 (Angeles Crest Highway), 9 mi past Red Box/Mount Wilson junction
  • Time: 4h11 total → 1h23 up to Vetter Mountain, 1h17 from Vetter to Mooney, 0h48 from Mooney to Devil Peak, 0h43 down from Devil Peak
  • Route Finding: Easy for Vetter Mountain and Mount Mooney, Difficult for Devil Peak

Route

Comments

We chose this route for it’s scenery — Vetter Mountain is one of the few mountains in the Angeles to have an unobstructed 360° view at it’s summit. For this reason, a fire watch tower sat on top of Vetter Mountain until the Station Fire. Although it has burned down, it’s foundation remains.

We had been planning to take the HPS #2 route up to the top of Vetter Mountain, but the vehicle gates in to the Charlton Flats Picnic Area were closed, which kept us away from the start of the route. Instead, we parked at the Charlton Flats turnoff from Angeles Crest Highway and took HPS #1 up. This route is largely a paved road hike, up until a short bit at the end which is dirt road, and finally a dirt path.

Stark

Unfortunately, as can be seen in the image above, the area suffered extensive fire damage in the Station Fire in 2009. However, there are still spectacular meadow views, and it is clear that the area has started to recover.

Winter Meadow View

As mentioned above, the summit has a spectacular 360° vista that encompasses the high desert peaks, the San Gabriel front range, and the tall mountains over near the Baldy Bowl. We were lucky, as the weather was clear enough that we could see out across the LA basin to Catalina Island, and we could see Mount San Jacinto way off in the distance.

Vetter Mountain Summit Panorama

After making it to the top of Vetter Mountain, we hiked back down to the Angeles Crest Highway. To get to Mount Mooney and Devil Peak, we crossed route 2 and went about 100 meters north. A paved road starts here, and turns into dirt about 0.1 mi later. This dirt road leads straight to a saddle, where the road continues off to the right, and a trail starts to the left. The trail is not marked but can be identified by a pair of signs that indicates that the area is off-limits to motorized vehicles.

Mount Mooney is an easy hike up, and presents spectacular views along the way. The summit is wooded, but there are several clear views along the trail that look towards Mount Baldy across the saddle between Mount Mooney and Devil Peak.

Mount Mooney Saddle in Winter

To get to Devil Peak, you head back across the saddle and follow the road towards an observatory. The road here has very nice views across a canyon.

Standing

Eventually, the road ends, and a faint trail heads up Devil Peak. We followed this trail into brush, where it went faint. From here, we bushwhacked our way up the mountain. It is very clear as to where the summit is, so once the trail dies off, just keep heading towards the high point. We did pick the trail back up, about 100 feet from the summit. Our navigation was complicated by snow on the ground — Devil Peak is more wooded and still had significant (but not deep) snow cover. Due to the thickness of the wood, the view at the summit is poor, but a nice vista can be found slightly to the south of the summit. This vista looks out over the San Gabriel front range.

Sunset Peak — November 25, 2012

On the Sunday after Thanksgiving, Iris and I set off for a quick hike up to Sunset Peak. Sunset Peak is one of the shorter peaks in the Mount Baldy area and provides a spectacular view of the Three T’s, Mount Baldy, and Ontario Peak.

  • Destination: Sunset Peak
  • Distance: 4.9 miles round trip, 1.7 miles up via HPS #1, 3.2 miles down via HPS #2
  • Elevation: 5,796 ft
  • Gain: 1,383 ft
  • Starting Point: Cow Canyon Saddle on Glendora Ridge Road, about 1 mile from the GRR/Mt. Baldy Road intersection
  • Time: 1h13 up, 1h13 down
  • Route Finding: Easy

Route

Comments

This hike starts in a very beautiful area, with both canyon and mountain views.

San Gabriels in Fall

We took the HPS #1 route up. This route follows a firebreak up the mountain and is very easy to find. At Cow Canyon Saddle, there is a gated fire road that runs alongside the mountain. This is the start to the HPS #2 route. The firebreak is about 100 feet to the east along Glendora Ridge Road, and starts by following an electrical line.

The firebreak climbs steeply, but is reasonably easy. There is some class 2 hiking going up this route, and it’d be a reasonably good idea to bring hiking poles (this, we did not do). At one point, the firebreak intersects with a forest service road. This forest service road is part of the HPS #2 route, and adds about one half mile to your climb. These two routes meet again at the top of the mountain.

The view from the top is a spectacular 360° view of both the Baldy Bowl and the valley leading into Mount Baldy Village. Directly to your north is Lookout Mountain, which is dwarfed by Mount Baldy. The Three T’s sit to your east, along with Ontario and Sugarloaf Peaks.

Civilization

We followed the firebreak back down to it’s intersection with the forest service road. Instead of crawling back down the firebreak, we opted for the much less steep route down the forest road. The forest road is a pleasant and easy hike but definitely does not have the views of the firebreak.

Since Sunset Peak is <6000 feet, it can be climbed year round as it’ll stay below the snow line. Note that the route up via the firebreak is completely exposed, so it should be avoided on hot and sunny days. The forest service road does have pleasant and ample shade.